Thursday, November 6, 2008

Election Day IPA - aka The Hop Bomb

Well, the first brew with homegrown hops is now in the keg...and a few bottles. I've decided to call it 'Election Day IPA' since it was kegged on election day. With the aggressive hopping of this beer, my nose was flooded with the aroma of grapefruit, causing my mouth to water during kegging/bottling.

When ready to consume, I'll post a picture of a pint and provide a general beer review. I'm not a certified beer judge, but am really looking forward to finding out if the homegrown hops taste good!

Sunday, October 19, 2008

Hop Garden - End of Season

After the last harvest, I left the plants to soak up as much sun as possible. Here in Oklahoma, the nights have started getting down to the low 50s so I decided it was time to trim back the plants and get ready for winter. I decided to experiment a bit to see if I could propagate some rhizomes for planting/exchange next spring. I decided to try 2 things, leave some bines connected to the crown and bury them, and trim some completely from the plant and bury them in a trench. I was told the latter wouldn't work, but hey it was worth a shot.

To start, I stripped all of the plants of foliage from the top, leaving the lower bines connected to the crown. The picture on the left is one of the centennial plants stripped. For the bines left connected to the crown, I created a coil around the main stem coming out of the ground (right). That coil was then covered with fresh dirt (lower left). I'm hoping that this will allow these bines to continue to be supported by the crown, but start to grow some rootlets.

The picture lower right is of the centennial bines I buried in a trench at the back of my hop garden. I just took some long bine sections from the lower part of the plant, dug a trench a few inches deep and then placed the bines in there. In the spring, I'll dig up the trench and see if the bines are still alive or whether they have died. Either way, I will not have lost anything!

Within the next few weeks, I'll be covering the entire hop garden in a blanket of leaves raked from the yard. These will help to provide a blanket over the winter and will be easy to remove in the spring. After harvesting rhizomes in the spring, I will put down a more permanent mulch.

The Hop Bomb - Active Fermentation!

After all the issues I faced with this brew, it's good to see that the yeast is happy! This being the first fermentation I've done in glass I was amazed at what went on during the fermentation. I decided to shoot some video of it and post it here.


We are now 3 days into fermentation and it has slowed some, enough that I could finally add an air lock. At the start of fermentation, I knew that it would plug up an airlock due to foam, so I just sanitized a plastic Arnie's Bar cup and used it to cover the top of the fermenter to keep anything from falling into it. I was also sure to put the fermenter in a plastic tub to keep from making a mess on the floor!

The Hop Bomb Nightmare Brew

Well, as previously posted, this brew was not all that enjoyable. I had several problems in getting it completed, and I hope that in the end it is worth all the effort.

I organized all the equipment and got the initial mash water warming to temp. At temp, I added to the mash tun and stirred in the grain. All going well. While warming the sparge water I ran out of propane and had to go ask my neighbor to borrow their tank. Lesson number one.... make sure you have enough propane for the brew!

I decided I wanted to do a little larger brew, so I planned to do 7 gallons. I ran the numbers in ProMash to determine how much water was needed for the mash. After the mash and sparge were complete, I had a full boil kettle, PLUS another 2.5 gallons of wort. Lesson number two.... get the new brew keggles completed so you have plenty of room to boil!

OK, so I decided to do a 90 minute boil, to boil down some of the volume before adding hops. That was going great until it boiled over on me, putting out the flame of my burner and subsequently gumming it up. I then had to remove the burner from the stand and clean it before I could proceed. Lesson number three.... avoid boil overs at all costs!

So, I got that cleaned up and got the kettle back on the burner and up to a boil. At the same time, I had the 'extra' wort boiling in smaller pots on the stove in the house. Gotta boil it for at least 60 minutes to get rid of DMS...I think it's DMS. It's for something! One of the pots boiled over on the stove making a mess! Lesson number four.... avoid brewing on the stove. Refer to lesson number two, gotta get the keggles done!

The rest of the boil went fine and I felt the trials were over. Wrong! When turning the water on for the wort chiller, I noticed that the line into the copper coil was leaking, and into the brew! A quick grab of the screw driver (still on the porch from the burner cleaning) to tighten the hose clamp fixed the problem. Lesson number five.... test the wort chiller during the brew to ensure it isn't going to leak!

OK, so the rest of the night went fine. After chilling, I whirlpooled to get the hop matter to the bottom of the kettle, then racked to the fermenter. I missed my target gravity by .02, so all in all not bad. Although, my target was only 70% efficiency. I think I'm going to see if adjusting the grain crush will help that.

The IPA is now happily fermenting. I used glass for my primary fermenter for the first time, and it has been very interesting to watch the fermentation. I never realized how much churning the wort did during fermentation, pretty freaking cool! It will ferment for another few days and then I will rack to the secondary and add dry hops.

Below are pictures from the brew:


Chek out the Arnie's Bar cup I used instead of the arilock. That will be replaced with an airlock after the initial fermentation slows.

Thursday, October 16, 2008

American Citrus IPA - The Hop Bomb

Well, I finally did it, I brewed with some of my homegrown hops. I've included the recipe below if you are interested. In another post, I'll go in detail about the nightmare that was this brew.

American Citrus IPA - The Hop Bomb

Grain Bill
---------------------------------------
14.00 lbs. Pale Malt(2-row)
1.50 lbs. Wheat Malt
0.75 lbs. Crystal 60L
0.50 lbs. Cara-Pils Dextrine Malt
0.50 lbs. Crystal 20L
0.50 lbs. Flaked Soft White Wheat
0.19 lbs. Chocolate Malt

Mash @ 154 for 60 minutes
Sparge @ 170 for 30 minutes

90 Minute Boil

Hop Schedule
----------------------------------------
60 Minutes:
1.50 oz. Amarillo Gold

20 Minutes:
0.75 oz. Amarillo Gold
1.00 oz. Cascade
0.50 oz. Centennial

5 Minutes:
1.00 oz. Cascade
0.75 oz. Amarillo Gold
0.50 oz. Centennial

Flame Out:
1.00 oz. Cascade

Dry Hop:
1.00 oz. Cascade
0.50 oz. Amarillo Gold

Yeast: Muntons Gold Dry

Sunday, October 12, 2008

2008 Harvest Totals

After drying and packaging, the final harvest yielded and additional 2.65 oz of cascade and 0.65 oz of centennial. When making the hop plugs (right), I did things a little differently this go round. I took a piece of cling wrap and placed over the end cap (lower left) of the plug chamber. I then with the cling wrap in place, inserted the tubing for the chamber (lower right). That way, when pushing the plug out of the chamber, it was already partially wrapped.


All in all, not bad for the first year.

2008 Harvest Totals
Wet Harvest:
37.30 oz Cascade
13.05 oz Centennial

Dry Packaged:
9.55 oz Cascade
3.20 oz Centennial

Friday, October 3, 2008

Final Hop Harvest - October 2

Well, the final cones have been harvested from the bines for my first year of growing. The last picking yielded in wet amounts: 2.80 oz of centennial and 11.40 oz of cascade. All in all, not a bad year considering most I've read says not to expect any hops the first year. I'll be doing a batch of pale ale or an IPA soon to try out my hops. Probably the IPA first, combining the homegrown cascade and centennial with amarillo. Yum!

My next post I'll have the total dry hop amounts for the year, and hopefully some pictures of hop plugs made with my new plugger!

Thursday, September 11, 2008

Third Hop Cone Harvest!

After looking at the plants, I decided that I had more cones ready to pick, and again had one or two that had already fallen off the bines. After picking I had 6.9 oz of wet cascades and 2.1 oz of wet centennial cones. After drying, I netted 2.0 oz of cascades and 0.5 oz of centennials.

I also endeavored to build a Hop Plugger (right) after reading some posts on the Grow Hops forum. I have posted instructions and pictures of my Hop Plugger Project on my BrewTech blog. It worked pretty well and I will probably use it again if I get the chance to pick cones one more time this season.

Friday, September 5, 2008

No Impacts from Hurricane Gustav

We did get some wind, rain and cooler temperatures but nothing near what I was expecting for storms. Watching the radar for 2 days, for the most part Gustav fell apart right as it hit the Tulsa area. The cascade cones I picked Tuesday are dry and in the freezer, only 0.35 oz, but at least I didn't loose them to the storm.

It's been quite a while since I've fertilized, so I plan on mixing up some Miracle Grow all purpose 15-30-15 and dispensing across the plants this afternoon. We'll see if I can get a last push of energy with the plants to get some more cones before the weather starts to turn cold. Still haven't gotten to High Gravity to purchase ingredients for a brew so I can try out some of the cones I've already harvested.....GOTTA GET THAT DONE!

Tuesday, September 2, 2008

Hurricane Gustav - Heading This Way

Well, now it's just a Tropical Depression, but it's still heading toward Tulsa at this point. My hop plants have done well with the recent heat and I'm hoping that this storm doesn't damage them too much. I've already harvested some cones, but there are much more to harvest and I'd hate to loose them to the storm! I took some time this morning to go pick the most ripe cones, only picking 1.55 oz of cascade. I was going to wait a while longer until more were ready to pick, but I bet a good hard rain will knock some of the ripe cones off the bine as I've already noticed a few have fallen off on their own. Not a lot picked I know, but the 15 minutes of effort are better than loosing them in the storm.

Bring on the rain!

Wednesday, August 27, 2008

Hops Update - August 22

Here in Oklahoma, we're still trying to get through the hottest days of the year, and yes, they have not been kind to my hops. My plants are still healthy and producing cones, but man they don't look too pretty anymore! As you will see from some of the pictures in this post, some of my hop cones and leaves are significantly brown and wilting. The interesting thing is that this is happening while new growth is showing within inches of what looks to be almost dead!

I've been watering the hops each day when the temperature is over 90F and so far, they are surviving. They soak up the moisture (along with the hot day) and are ready for more the next day. I'm trying to decide whether or not to trim some of the bines back where I have already harvested cones, so that the plant can focus energy on new growth.

My Goldings plant is producing more and more cones, although they are all very small. I've heard others haven't had the best of luck with goldings in the lower latitudes, so maybe this just isn't the right climate. I'm not giving up though, hopefully I'll be able to at least harvest enough to brew one batch of my brown ale that uses goldings.

And lastly, is a picture of the whole hop garden. It's hard to believe that just 5 months ago, this area of the back yard was basically weeds that was a pain to mow! Now it is helping in my quest to brew good beer.....well, as soon as I get the ingredients pulled together to do a batch and start using some of the harvested hops!

Sunday, August 17, 2008

Second Hop Cone Harvest!

This week I when I checked the Centennial and Cascade plants, I noticed I had a lot of cones browning (some significant). Also, the majority of the cones had that papery feeling so I decided to do another harvest. Below are pictures of the harvested cones. If you look closely, you can see some cones almost completely brown, with others while still mostly green have browning of the tips.


I also took one of the larger cascade hop cones and split it down the middle. If you look real close, you can see the yellow substance among the leaves which is lupin.


In total, I harvested 6.65 oz of Centennial and 12.95 oz of Cascade this time (wet). After drying, I ended up with 1.7 oz of Centennial and 3.5 oz of Cascade.

Here are my totals for the year so far:

Wet Harvest:
17.45 oz Cascade
8.15 oz Centennial

Dry Packaged:
4.55 oz Cascade
2.05 oz Centennial

Hops Update - July 31 Growth

It's been a few weeks since I posted an update. Not a lot to discuss in this post but I've included a few pictures I took the end of July. I was finally able to get a few good close up pictures of the cascade hop cones still on the bine. I also took a picture of the 2 cascade plants together that show a lot of cones, and the last picture shows the base of the OK goldings plant. On all of my plants I stripped the bottom 2 feet of vegetation to minimize the possibility of mildew and insect problems.

Thursday, July 31, 2008

Hop Cone Drying and Packaging

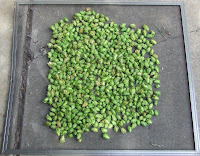
The hope cones that were harvested last weekend have been dried and packaged. To dry them I took a house window screen I had in the garage and spread the picked hop cones on it. I left it in the garage for 2 days, placed so that air flow could reach the hops from above and below but didn't use a fan or applied heat to help in the drying process.

Once dry, I packaged in zip lock bags, compressing the hop cones to purge as much oxygen from the packaging as I could. I did run into a problem however. When compressing the cones in the bags, I did get punctures through the plastic. To fix this, I used a bag inside bag approach to ensure a seal. For the next harvest, I'm either going to get thicker bags, or possibly spend the money on a vacuum sealer.

In total, I ended up with 1.05 oz of dried cascade hop cones, and 0.35 oz of dried centennial hop cones.

Sunday, July 27, 2008

First Hop Cone Harvest!

Well, after debating on what to do, and looking the plants over, I decided to go ahead and harvest some cones. Several of the cascade hop cones were showing significant browning, and a few of the centennial hop cones had actually fallen off the bines on their own. My wife was kind enough to come take some pictures of me in my first harvest, so now you can see my ugly mug! It was very rewarding getting a chance to harvest my own hops, hoping to brew with them soon. I'm going to wait until my main harvest to brew a 'harvest ale' so, the harvested cones are now sitting in the garage on a window screen to dry. I do not have a vacuum sealer, so once dried I plan on packaging in good quality freezer bags, purging with CO2 to eliminate oxygen from the packaging.

Below are pictures of the harvested hop cones, cascades on the left, centennials on the right. In total, I ended up with 4.5 oz of cascade cones, and only 1.5 oz of centennial cones. Not a lot harvested, but I didn't want them to go bad!

Friday, July 25, 2008

Hops Update - July 24 Growth

Since the last hops update, we have had very hot temperatures (95F-98F) and absolutely no moisture. I've been watering every day but still have some leaves browning and some withering due to the heat. We finally hit the hot, dry Oklahoma summer! Overall, the hops are still very healthy (right) and all of the plants are shooting laterals everywhere. The Goldings has finally started producing burrs, so I'm hoping we'll at least see a handful of cones before the end of the growing season! If so, we'll be able to get hop cones off of all the rhizomes planted (First Season!), except for the one heavily damaged by storms early in the season.

Other than the goldings, the other 4 plants all have produced cones and some seem to be ready to harvest based on what I've been reading in the grow-hops forum. All of the plants are still producing new burrs but some of the cones are papery to the touch and starting to brown slightly. I've had a few cones dry enough that they have fallen off the bine, so I may not have a choice on whether to harvest some or not. Pictures: Cascade Hop Bines (above left), Centennial Hop Bines (right), Cascade Hop Cones (lower left), Centennial Hop Cones (lower right).

Wednesday, July 23, 2008

Hop Pictures - Night Shots

I decided to try and take some pictures of the hops at night. I've seen some very interesting pictures of hops taken at night, but think I have a lot more learning to do to get good pictures. Figured I would share some with you anyway.